Monday, August 31, 2009

Candied Pecans

A few years ago I ordered a salad in a restaurant. I don't remember which restaurant. I don't remember what kind of salad. But on that salad was something that I have never been able to forget... candied pecans. They were not only the highlight of the salad but they were the highlight of every salad I've ever had! They were THAT amazing :)

I've tried to duplicate that experience by making my own candied pecans. I've tried a couple of recipes and as soon as I found this one I stopped looking. They are so good I have often eaten them by the handful. Just warning you... :)

Let's begin......

The ingredients are simple. Salt, pepper, cayenne, sugar, corn syrup, and pecans.

First we place some plain old regular white sugar in a bowl. I made triple the recipe so normally you wouldn't need a bowl quite this big. Sorry Weeza, I forgot my ruler.

Then I added some white corn syrup. Hey, I was kind enough to leave the bottle in this picture so that'll give you some idea of the size of the bowl.

Then the kick... salt, black pepper, and cayenne pepper. If you don't like a kick then omit the cayenne. But I like kick so..... cayenne-orama :)

Mix it all together until it looks really greyish and disgusting. Give it a tiny taste just to make sure you haven't gone too far into pepper-land. Adjust the sugar-salt-pepper ratio accordingly.

Then mix in the nuts. Gently stir them for a minute or so to ensure they are evenly coated with the mixture.

And spread the nut mixture out on a foil lined cookie sheet. I normally use just pecans but this time I decided to use half pecans and half almonds. Do I live on the edge or what?

This was triple the recipe. I have made quadruple the recipe before but with that many nuts you will need to use two cookie sheets. The nuts should be a single layer only.

After baking for about 15 minutes the nuts came out of the oven and I spread them out on aluminum foil. The candy glaze on the nuts will harden very quickly so make sure you spread the nuts out using two forks.

When they have cooled to room temperature these nuts will keep in an airtight container for a week or so.

For the original recipe check it out on Smitten Kitchen's site... Sweet & Spicy Candied Pecans. There are some cool salad tips there too.

Saturday, August 29, 2009

Fettuccine Alfredo.... to the extreme!

I made a couple of Alfredo sauce recipes a few weeks ago and found one that I really enjoyed. You can read about it on the entry called Fettuccine Alfredo... part 2.

So now it's time to raise the stakes. Can the sauce handle being baked with cheese a la Boston Pizza?

We'll start with some individual casserole dishes. You can use a larger one for a family meal but Vince & I wanted different additions to our pasta so we decided to make individual meals. I don't know if it was necessary but I sprayed them with non-stick spray. If nothing else, it'll ensure that cleanup will be easier.

This is what I wanted to add to my baked fettuccine alfredo. It's a mixture of diced bell peppers (various colours), sliced onions, broccoli, celery, and green onions. The colours are so pretty in the bowl and I love how they are reflected in the shiny sides of the bowl :)

Cooking the noodles and alfredo sauce. Yum yum yum.

I made the alfredo sauce with 2 cups of half n half this time instead of 2 1/2 cups of heavy cream. Unless you are trying to induce a heart attack, I strongly recommend making this change. I preferred the lighter texture of the sauce but there was no compromise to the flavor.

I also doubled the required amount of cream cheese from 2 tablespoons to about 4 tablespoons... but that was just because that's what I had left in the package and didn't want to re-wrap a wee morsel of cream cheese to put back in the fridge.

I drained the pasta and added it to the veggie mix........

.....and poured the sauce on top.

I followed my own advice from my previous post on the sauce and let it simmer for a while to thicken it. It worked but I think it would be okay to add a little flour in the form of a roux if you wanted it even thicker. Just be careful not to overdo it as it could get pasty.

Toss it all around until the sauce evenly coats the pasta and vegetables. This was easier said than done as the veggies didn't want to mix with the long strands of pasta. It would be easier to toss with a smaller pasta shape such as shells or bowtie pasta or macaroni.

I divided the pasta-veggie mix into the casserole dishes. You can see here how some of the dishes got more veggies than others due to how they didn't mix together too easily. You can also see that one of my oval casserole dishes became a rectangle. How did that happen??????

I topped the dishes with some shredded mozzarella and shredded parmesan cheese then placed one in the toaster oven (perfect when cooking for one). It baked for about 30 minutes at 350 then I turned the dial to broil and cooked it for another 5 minutes or so. Watch it carefully as it'll brown very quickly in the toaster oven.

I pulled it out of the oven just when the cheese was getting toasty brown... so yummy. A little sprinkle of parsley and I'm ready to dig in. Was it as tasty as it looks?

Uh, yeah. It really was. The first few bites I wasn't too sure about because the sauce was very liquidy. It thinned as it cooked in the oven. However, after I'd eaten about 1/3 of it I noticed that the sauce was getting much thicker and sticking to the pasta and veggies better. Therefore, I think the recipe would be perfect if you let it sit for about 5 minutes to let the sauce come together and thicken after taking it out of the oven.

Enjoy making a pasta dish that rivals Boston Pizza. If the foodiestudent can do it then you know you can too! :)

Thursday, August 27, 2009

Chicken Chimi

In my quest to find new recipes for chicken I ran across this one for Chicken Chimi or Chicken Chimichangas.

It went like this....

The recipe calls for chicken that is already cooked. I find the fastest way to cook raw chicken is by poaching it (pot on the left). It doesn't result in great flavor and you have to be careful not to overboil it so it doesn't get hard, but it gets the job done. In the pot on the right are sauteeing onions. This will become the sauce.

The spices are simple... just chili powder, cinnamon, and cumin. Optionally just use a package of taco seasoning.

The recipe calls for 2 cups of salsa but my dear husband is allergic to raw onions so I substituted canned diced tomatoes and some cilantro. It never occurred to me at the time that I should add some hot sauce too. I would come to regret that LOL.

Here the sauce has reduced down and diced chicken added. If I had bothered to taste it I would have realized it needed a kick and added the hot sauce here. But I was distracted by my husband walking in the kitchen and asking what I was making. I'm easily distracted I guess LOL.

Uh, I missed a few steps between the last picture and this one. Remember... husband, distraction, etc.

So all I did was take a whole grain tortilla, place some refried beans down the center, topped the beans with the chicken mixture, rolled it up (repeat with 6 tortillas) and baked them all in the oven.

Lessons learned:
  1. Mexican food needs spice! If you are going to substitute diced tomatoes for salsa make sure you add hot sauce, pepper, green chillies, jalapenos, almost anything to give it more of a kick. I put some salsa on the side and that helped up the interest factor.
  2. The recipe says to serve with sour cream, guacamole, and cheese. I would suggest if you are using cheese to put the cheese inside the wrapped tortilla before baking. It would melt and get all gooey. So unless you don't like melted and gooey I'd give that a try.
  3. Baking or bbq'ing chicken would result in better chicken taste and texture. Although poaching works on short notice.
This recipe was pretty good and I'd probably make it again. If you have children who don't like vegetables it would be easy to add vegetables to the chicken mixture and sneak them in that way. Carrots, zucchini, corn, celery, bell peppers.... all would work well in there.

Anyone have any chicken recipes they really like? I'm always looking for new ones :)

Tuesday, August 25, 2009

iPhone Recipe Apps

Today's post is by our favorite (and thus far, only) guest blogger, Louisa. Thanks for doing another blog entry for us Weeza :)

Greetings, gentle readers. This is another guest post by Foodie Student’s Sister (FSS). This time around, I’m reviewing four recipe apps for iPhones. (Sharp-eyed readers will notice that once again I managed to avoid doing any actual cooking…)


The four apps I reviewed are All Recipes, Betty Crocker, Big Oven, and Epicurious. All four apps are free to download from the iTunes store, and all four have corresponding websites that use (presumably) the same recipe databases as their iPhone counterparts.


I tested each app searching for mocha brownie recipes (or just brownies if no mocha variations available) and then trying a few things like marking a recipe as a favourite, and using any special features.


All Recipes


The good: Search results display in a nice-looking list with ratings and photos. Nutritional information and reviewer comments are available at the bottom of each recipe. The spinner feature is cool (see picture below). The app lets you build a list of your favourite recipes, sorted alphabetically.


The bad: All Recipes claims to have “thousands” of recipes but it’s the only app that didn’t have any recipes for mocha brownies.


The ugly: Before you can view a recipe you have to look at an ad for a few seconds. There is also a smaller ad on the recipe itself. Within a few minutes I was sick. to. death. of those ads.


Verdict: 3/5 stars (would be much higher without the ads; note, there’s no option to pay a few dollars to remove the ads, as some other apps have)


Betty Crocker


The good: All the recipes have photos and there are no ads. Yeah! The “Search by Ingredient” and “Surprise me!” (random recipe finder) features are great. Recipes include nutrition information.


The bad: The Betty Crocker app claims to have over 4,000 recipes, the lowest of the four apps. The interface feels big… big buttons, big spoon at the top of the screen, etc. It crowds out the recipes themselves a bit, which is fine for browsing, but not good if you want to read a recipe carefully.


The ugly: iPhones have a feature where if you’re scrolling down through a long screen (e.g. reading a recipe or looking through a list of search results), you can quickly jump to the top of the screen by tapping the top of the screen. The Betty Crocker app has disabled this feature, which is a real nuisance.


Verdict: 4/5 stars (would be higher if there were more recipes)


Big Oven


The good: Big Oven claims to have over 160,000 recipes, by far the most of the apps I reviewed. A few recipes include Weight Watchers points and diabetic exchanges. The app includes a food/cooking dictionary.


The bad: Many recipes don’t have photos. The search results display kind of like newspaper pages, which is a bit weird. The interface overall is just a little awkward (e.g. the home button is an “H” instead of a little house). You can’t build a favourites list unless you have an account.


The ugly: Could somebody please tell me wtf is with this ad that appeared on every page?


Verdict: 2.5/5 stars (would be higher if the app didn’t constantly push you to sign up for an account)


Epicurious


The good: The Epicurious app has a nice interface, easy to use, which is a big plus. It claims to have over 25,000 recipes, and has a reputation for good recipes.


The bad: The search feature is a bit slow, and while you wait you have to look at a full-screen ad. (Cynically, I wondered if the search is deliberately slowed down for more ad time.) The search results display one hit at a time, and you have to scroll to the side to see more search results. This makes it very hard to scan the list quickly. Many recipes don’t have photos.


The ugly: It’s great that the app has a shopping list, but: (1) You can’t export the list or add anything else to it, meaning you would have to use this in addition to any other grocery list you might have. And, (2) if you make a shopping list from multiple recipes, the common items aren’t combined. So, you’ll see “2 cups sugar” near the top of the list, then “1.5 cups sugar” again halfway down. It should either say “3.5 cups sugar” or at least put the two sugar entries together on the list.


Verdict: 3.5/5 stars (would be higher with fewer ads and better search results)

Photos:


So, out of these four apps, my favourite was the Betty Crocker one, but All Recipes would have been the champ if not for the overbearing ads. And it seems to me you would never want to follow a recipe on a tiny iPhone screen (or risk spilling food on it), so use these apps to find a good recipe, then email it to yourself to print off (all the apps had this feature).


There are lots of other recipe apps for iPhone. If you have one you really like, post it in the comments and let us know what you like about it. Thanks!


Signing off,

FSS


FS note: Uh, I have a blackberry, not an iPhone. Can you review some BB apps in a post that might actually be helpful to me?????

Sunday, August 23, 2009

My Foray into Vegetarian Cooking

I'm not a big meat eater. I'm not vegetarian, per se, but I prefer to keep my meat servings quite small. My husband is the opposite as he enjoys larger servings of steak, chicken, anything with protein. However, as I was cooking only for myself one evening I thought I'd give a vegetarian recipe a try.

I started with some chopped peppers. Look at the beautiful colors in this dish. I love how pretty the yellow, orange, red, and green peppers look all chopped up and intermingling.

To the peppers I added some chopped onion and garlic. I also chopped up a jalapeno pepper. The majority of heat from jalapeno peppers resides in the seeds and membrane so I scraped most of those out before dicing it up and adding it to the mixture in the pie pan.

I then drizzled on a little EVOO (extra virgin olive oil), added some kosher salt and freshly ground black pepper, and tossed them all together. Then the pan went in the oven for about 10 minutes to lightly roast the vegetables.

Ta-dah! These were lightly roasted... barely a hint of brown on the edges of some of those onion pieces.


I topped these with a semi-drained 14 oz can of diced tomatoes. The recipe called for them to be drained but I just did the "open the can, hold the lid on, and tip the can over" system to drain the tomatoes. Next time I'll use a strainer or colander to drain them properly as excess water is a bad thing here.

I then topped the tomatoes with some chopped feta cheese.

Then some rolled out puff pastry went on top and it all went back in the oven for another 20 minutes.

After 20 minutes it looked like this. The puff pastry was done to perfection.

Then the whole she-bang got flipped over onto a plate and in many ways resembled a pizza.

And the result?.... meh. With some changes it could be quite good but as it was, not so great.

Lessons learned or changes I would make include:
  1. The aforementioned draining of tomatoes. I didn't drain them as fully as I should have so after a few bites I noticed a pool of tomato-water on the bottom of the plate so I tilted it over the sink and let quite a bit of water drain away. It would have been best to get rid of this before it soaked the puff pastry.
  2. Garlic. I chopped the garlic as the recipe called for but next time I will mince it. Some pieces were too large to eat and I ended up picking them out.
  3. Feta cheese seemed like such a good idea when I was reading the recipe but as it turns out it was the weakest part of the dish. The feta did not melt. Instead it heated up and became the consistency of scrambled eggs. I do not care for scrambled eggs but even if I did I don't think they would go very well in this dish. I would definitely substitute another type of cheese for feta... preferably one that melts well or is a little smoother.
  4. Flavor-wise this was a little bland, even with the jalapeno pepper. The only spices called for are salt and pepper. I'd kick it up with any number of spices or herbs. Any spices used in Italian cooking would go well. Or how about some chili powder? Vegetarian cooking shouldn't equal boring.
  5. A note about the puff pastry. The box includes 3 methods for thawing... 2 hours at room temp, 4 hours in the fridge, or 2 minutes in the microwave. I used the microwave method for this recipe and I was not impressed with the results. It thawed unevenly (warm/cooked on the outside while still cold/frozen in the middle). This made for difficulty in rolling out and working with the pastry although the taste in the end was fine. Given the option, thawing in the fridge or at room temperature yields the best results.
So, would I make this again? Probably not. I could do so with the above changes but there is a whole world out there of vegetarian dishes I'd like to try. I would make any number of those before coming back to this one.

Friday, August 21, 2009

Puff Pastry Appetizer

A few days ago I blogged about making a puff pastry appetizer for a party. It was a totally made up recipe and I was quite proud of it so I made it again just for you to see, and maybe drool over ;)

Hello little puff pastry square. Welcome back into my life. I have missed you so. But the honeymoon is over and now I have to destroy you... mwa ha ha ha!

You are now a flatter version of your former self.

The box says to roll the square out to 12" X 12" but I got a little carried away and this was more like 15" X 15".

Then I took some pecans and gave them a rough chop. No need to make them smaller than this... we're looking for some crunch here, not pecan dust.

I placed 1/2 a block of cream cheese in the middle of the rolled out puff pastry. Then I topped it with the chopped pecans. Some overflowed... it's all good :)

Then I topped the whole pile with some brown sugar.... about 4 or 5 tablespoons. This looks like a lot of brown sugar but it really wasn't. It added some sweetness to the appetizer but definitely wasn't too much.

Then I brought the corners together at the top and pressed them together. I sealed any other openings by pressing the pastry together. A little water helps if the pastry is reluctant to cooperate. This made a nice sealed package so nothing could ooze out prematurely.

I sprayed the baking sheet with Pam but I doubt it was really necessary. And I love that this is small enough to bake in the toaster oven.

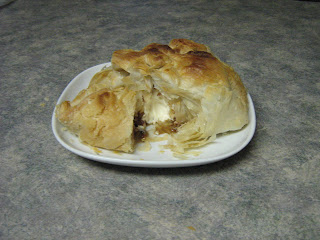
And here it is all toasty brown on top. Yum yum yum.

I cut open the pastry appetizer so you could see the innards but it's a little hard to see. You can see the cream cheese in the middle and there's a glimpse of the caramel (cooked brown sugar) and pecans on the left.

Lessons learned (as I am foodiestudent I have much to learn and take lessons away with every experiment):
  1. The puff pastry box says unless you have a recipe, to bake the pastry at 425. However, as this recipe has a filling I think it would have worked better at about 400 for a slightly longer cooking time. The cream cheese would have had a better chance to melt and there were pockets of brown sugar that hadn't melted enough to be a caramel sauce so a little longer time in the oven would have rectified that.
  2. The puff pastry rolled out was easily large enough for a whole 250g box of cream cheese to be used in the recipe.
  3. This is a rich recipe so don't try to eat it all by yourself. The first few bites were very good but after that I felt obligated to eat it because it was so good but I felt very blah after a while because it was so heavy.
Here is the recipe if you'd like to try it yourself....

Cream Cheese Pastry Appetizer

1 sheet/block of frozen puff pastry, thawed
1 250g block of cream cheese (regular or light)
1/3 cup pecans, rough chopped
1/4 - 1/3 cup brown sugar
3 - 4 apples, sliced
lemon juice

Preheat oven or toaster oven to 400 degrees. Roll out the puff pastry to about 12" X 12". Place the cream cheese on the center of the pastry. Top with pecans and brown sugar.

Bring corners of pastry up to the top of the cheese mound. Seal together in a decorative fashion using a drop or two of water if needed.

Bake in preheated oven for about 40 minutes or until toasty brown on top. Serve with sliced apples drizzled with lemon juice (to keep them from discoloring).

Wednesday, August 19, 2009

Butter Chicken

I have been making Better Butter Chicken out of the Eat, Shrink, and Be Merry (ESBM) cookbook for months. But at the request of my cousin Sarah, I started looking for another butter chicken recipe that didn't use any premade sauces or marinades. The recipe from ESBM uses bottled tandoori marinade on the chicken and the rest is from scratch. But this new recipe uses nothing premade which is preferable to me as who needs the extra sodium and preservatives found in the store bought stuff?

I found this recipe for Butter Chicken on the Tasty Kitchen website. It is an off shoot of Pioneer Woman's website which is my new "first stop" when looking for new recipes :)

It starts with cutting boneless, skinless chicken breasts (or your cut of choice) into 1 inch cubes and marinating them for 30 minutes - 24 hours. The marinade is simple.....


Just cumin, ginger, salt, and yogurt. The recipe calls for "Greek plain yogurt" but I couldn't find anything like that in Safeway so I went with Lucerne instead :)

The chicken cubes went for a little swim in the marinade. My intention was to cook them an hour later but life had other plans for me and I didn't get to them for 24 hours. this turned out to be a good thing as the meat became very tender with the extra time to marinate.

To save on clean up time, and let's be honest, we all want to save on clean up time.... I lined the baking sheet with foil before lining up the chicken cubes for baking. These went in the oven at 350 for 30 minutes.

Now is a good time to start the sauce. If you start the sauce within about 10 minutes of the chicken going in the oven you will find that when the chicken is done it will be the right time in the recipe to stir it into the sauce.

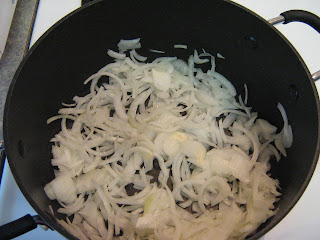
We start the sauce by sauteeing an onion in a tablespoon of oil. I sliced this onion using a food processor. Ah, I love my food processor. It never makes me cry when slicing an onion :)

The next step is mixing in some spices. But instead of taking a picture of the jars like I normally do (yawn) I measured them into this cute little bowl. There are six spices here, can you guess what they are?

(insert the theme music from Jeopardy! here)

Time's up. How many did you get right? :)

Here are the spices mixed with the sauteed onions. This step looks disgusting but smells wonderful. The butter chicken spices are starting make the whole kitchen smell like "Bombay Sweet House" (best Indian food in Calgary! If you are ever in north east Calgary make a point of stopping there for some butter chicken, naan, and any one of their many desserts).

Canned tomatoes, tomato sauce, and chicken have been added now. All that's missing is a little heavy cream and butter for some added richness. Although this could possibly be skipped for a healthier version.

With ESBM's version I take about 1/2 of the mixture and mix it in the blender just before adding the chicken. This results in a smoother overall texture. However, this version was quite smooth and didn't require that extra step.

And here's the final product. A little salad and wild rice completes the meal.

Now, I've got to say, compared to ESBM's version, this was creamier and tastier and really was no more difficult than the version using the bottled marinade.

But beware, this version is deceptively spicy. If you are serving it to children or people who don't like spicy foods make sure you have some extra yogurt on hand to dilute it. You could also rinse the marinade off the chicken before baking it but if you take too much off you risk removing too much flavor from the whole dish. And some people like full flavor :)

When I make this again I will try adjusting the last step. Instead of adding heavy cream and butter I'll try substituting half n half for the heavy cream and skip the butter all together. But other than that I like the recipe just as it is. It gets two big thumbs up from the foodiestudent! :)